Most of the product I've used here is new product that will be introduced on September 1, 2011 in the Holiday Mini Catalog. Oh my goodness, let me warn you again, this mini is packed full of 42 pages of awesomeness!
This is going to be a rather long post so if you want to get a cup of coffee or a soda grab that now. Here we go ~
Here's the Accordion Rosette I created with the new Spice Cake Designer Series Paper ~ one word ~ Yummy! This rosette is just over 6" across. I plan on using it as an embellishment on a Fall Scrapbook Page. You can make them just about any size you want.
 For the 6" Rosette ~
1) Cut 2 strips DSP 3-1/2" x 12" and score at 1/2" along the 12" side. Choose the front of your rosette and fold the 1/2" strip from the back to the front and adhere. With the double sided DSP, you now have a strip of coordinating paper on the front of your rosette.
 2) Score at every 1/4" across both strips. This is amazingly easy with one of the new tools being introduced in the mini ~ hint hint. Fold accordion style.
 3) Using Sticky Strip, adhere both ends together, forming a tube. I recommend Sticky Strip rather than Snail because it is a much stronger adhesive and won't pull apart.
 4) Gently pull the top of the tube together and ~
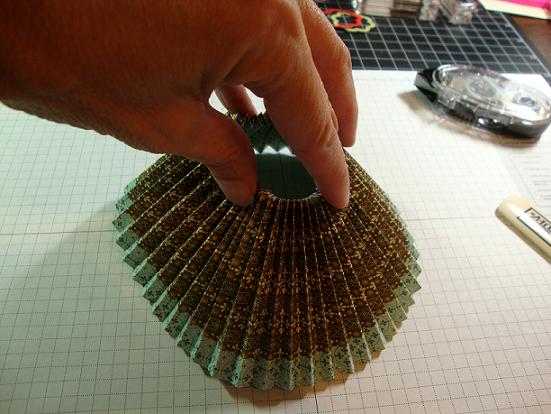 5) Push it down. There's your Rosette ~ embellish to your liking!
 6) I punched a 2-1/2" circle and used Sticky Strip to adhere it to the back to stabilize the rosette while I decorated it.
 I used the Scallop Circle #2, Two Tags Die and the Big Shot. The leaves are from the new Gently Falling Stamp Set from the Holiday Mini, as is the Designer Button. These new buttons are 1-1/2"! I wanted something with more of a contrast that would coordinate with my paper to put in my button, so I cut a very thin strip of DSP with my Table Top Cutter to weave through the button holes.
Here's a close up of some of the details ~
 Can you imagine a Christmas tree decorated with these, or making all of your Christmas tags like this? Oh, the possibilities! Now is the best time to stock up on card stock to create your rosettes, with the Buy 3 Get One Free Promotion through August 31.
Leave me a comment & let me know how you liked my second step-by-step tutorial.
Thanks for stopping by ~
dd
10 comments:
I loved you directions and pictures on this accordian rosette! Thanks for listing the items used, and even showing other tools used in each step.Whether you used your snail or bone folder. Your idea for folding a 1/2" strip back of the DSP is genius!
This is so pretty! I love everything about it...makes me super impatient for my pre-order to arrive!!!
WOW..........it really looks so simple......WOW!!!
So beautiful. I have tried several of my own, but love how you folded the DSP! Can't wait to try it. Thanks for sharing your directions.
Thanks for the great tutorial. You did an awesome job on this rosette and I can see why it would be addicting.
Thanks for sharing!! Your picture instructions help a lot!
This is beautiful! Love the idea of folding the paper over to get both sides of the dsp on your rosette! Brilliant!!! Thanks for the wonderful tutorial!
I love this rosette! I featured it on my blog The Crafty Blog Stalker. I would love for you to come grab a feature button!
http://thecraftyblogstalker.blogspot.com/2011/10/accordion-rosette-gift-topper.html
I saw this over at the Crafty Blog Stalker. So unique and lovely! I can't wit to make one myself!
Hello! I featured you a while back on my blog, The Crafty Blog Stalker but I thought you would like to know that I have featured you again! I took your rosette pattern and made a banner. I would love for you to check it out! http://thecraftyblogstalker.blogspot.com/2012/01/create-banner.html
Post a Comment