Stampin' Up! Independent Demonstrator ~ Debbie Dutchess ~ www.debbied.stampinup.net ~ debbiedutchess59@gmail.com

Thursday, August 11, 2011

Accordion Rosette With Tutorial

Today I have a little treat for you. Well, kind of two treats. A sneak peek of some of the products you'll see in the Holiday Mini, along with a step-by-step tutorial on how to create one of the newest crazes in card making and scrapbooking ~ Accordion Rosettes. Let me warn you though, once you make one, you're going to want to make more. These are addicting!

Most of the product I've used here is new product that will be introduced on September 1, 2011 in the Holiday Mini Catalog. Oh my goodness, let me warn you again, this mini is packed full of 42 pages of awesomeness!

This is going to be a rather long post so if you want to get a cup of coffee or a soda grab that now. Here we go ~

Here's the Accordion Rosette I created with the new Spice Cake Designer Series Paper ~ one word ~ Yummy! This rosette is just over 6" across. I plan on using it as an embellishment on a Fall Scrapbook Page. You can make them just about any size you want.

For the 6" Rosette ~
1) Cut 2 strips DSP 3-1/2" x 12" and score at 1/2" along the 12" side. Choose the front of your rosette and fold the 1/2" strip from the back to the front and adhere. With the double sided DSP, you now have a strip of coordinating paper on the front of your rosette.

2) Score at every 1/4" across both strips. This is amazingly easy with one of the new tools being introduced in the mini ~ hint hint. Fold accordion style.

3) Using Sticky Strip, adhere both ends together, forming a tube. I recommend Sticky Strip rather than Snail because it is a much stronger adhesive and won't pull apart.

4) Gently pull the top of the tube together and ~
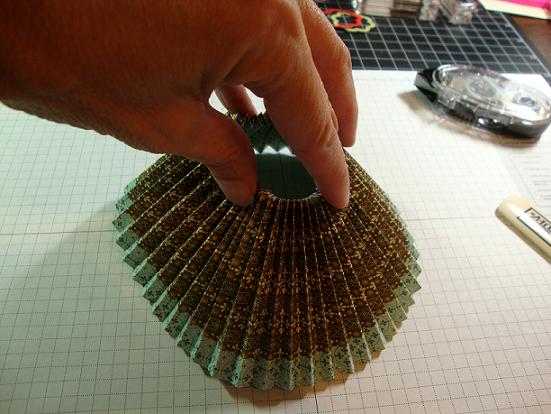
5) Push it down. There's your Rosette ~ embellish to your liking!

6) I punched a 2-1/2" circle and used Sticky Strip to adhere it to the back to stabilize the rosette while I decorated it.

I used the Scallop Circle #2, Two Tags Die and the Big Shot. The leaves are from the new Gently Falling Stamp Set from the Holiday Mini, as is the Designer Button. These new buttons are 1-1/2"! I wanted something with more of a contrast that would coordinate with my paper to put in my button, so I cut a very thin strip of DSP with my Table Top Cutter to weave through the button holes.

Here's a close up of some of the details ~

Can you imagine a Christmas tree decorated with these, or making all of your Christmas tags like this? Oh, the possibilities! Now is the best time to stock up on card stock to create your rosettes, with the Buy 3 Get One Free Promotion through August 31.

Leave me a comment & let me know how you liked my second step-by-step tutorial.
Thanks for stopping by ~
dd

Monday, August 8, 2011

Hello My Friend

I must say I'm very pleased with today's card. This stamp set, My Friend, was one of the first ones to go on my Wish List from the new catalog. I just Love the swirly hello sentiment.

I used the new Fancy Fan Letterpress Plate to create the background. I inked up the plate with Versa Mark, placed my Baja Breeze card stock on top of it, and ran it through my Big Shot. This embosses the card stock and gives it the tone on tone look at the same time. The base of the card is the new In-Color, Island Indigo. Check out the new Ruffled Ribbon. This comes in all of the new In-Colors. The lacey border was created with the new Lace Ribbon Border Punch. I just cut it in half and put it above and below the Whisper White Card Stock used for the sentiment.

See the stamping on the little butterfly? This is another stamp from the My Friend stamp set. I stamped a scrap of paper with Baja Breeze Classic Ink, and then used the Beautiful Wings Embosslit Die and my Big Shot to punch it out. I've used all 3 different sizes of Basic Pearls to put the finishing touches on my card. Two medium pearls on the body of the butterfly, 3 large pearls on the ribbon, and the tiniest one on the swirl in the words my friend.

Don't forget to stock up on your DSP this month. Buy 3 packages and Get 1 FREE! Contact me for more details, or visit my website.

I hope you enjoyed your visit. Thanks for stopping by!
dd

Friday, August 5, 2011

Christmas in July

Well, it was still July when I made this card. We had our Group Meeting last weekend and this is the card I made to share.

We did our shoebox swap again, because we all enjoy it so much and it's a great way for all of us to get several new samples to share. Each Demonstrator designs a card and prepares everything for every other Demonstrator to make it. Then, we all rotate stations making each card. It's great to relax and make cards that someone else has designed & prepared. We also bring other samples to share, have product demonstrations, discuss business and eat great food. I always look forward to these days. They are such an inspiration and I truly enjoy spending time with my Stampin' Up! family.

I used several components on this card. I don't think I can complete a project without my Big Shot. I used it, along with the Perfect Polka Dots Embossing Folder, the New Fancy Fan Letterpress Plate, the Scallop Circle #2 and Circle #2 Bigz Dies. The trees were stamped using the Masking Technique. I used my new Pennant Parade Stamp Set and coordinating Petite Pennants Builder Punch with Stampin' Dimensionals to pop up the center tree. I added some of the New 3/8" Lucky Limeade Ruffled Ribbon, a Mini Vintage Tag, and Cherry Cobbler Bakers Twine. For the finishing touch, I topped each tree with a Basic Rhinestone.

If you have questions about becoming a Stampin' Up! Demonstrator and want to join our "family" and be a part of our next group meeting, contact me any time. I'd love to chat with you about what I do!

Thanks for stopping by ~
dd

Monday, August 1, 2011

Buy 3 Get 1 Free!

A new month ~ a new promotion! I don't know how they do it, but every year the Stampin' Up! catalog just gets better & better. This year, I am in Love with all of the new Designer Series Paper, so I was super excited when I heard about the latest promotion.

Starting today, through August 31, when you buy 3 packages of Designer Series Paper, you get a 4th one FREE! Now is the perfect time to stock up for your holiday projects, scrapbooking needs, or just add to your stash. You can bet that's what I'm going to do!

There is no limit to the number of FREE packages you can earn. The more you order, the more you get FREE! Specialty Designer Series Paper and Hostess Designer Series Paper are not included in this promotion and can not be redeemed through this offer. This does include all of the regular Designer Series Paper in the 2011/2012 Idea Book & Catalog as well as the Nautical Expedition DSP in the Summer Mini.

Don't need 3 packs of paper right now? Get together with a friend to place an order and then share your FREE pack! Each package of DSP comes with 12 total sheets of paper ~ 2 each of 6 double-sided designs ~ perfect for sharing.

Contact me today to place your order and get your FREE Designer Series Paper, or visit my website and order online!

Thanks for stopping by ~
dd

Friday, July 22, 2011

Flirtatious Bag with Flower

I thought my bag from my previous post was a bit plain, so I added a matching fabric flower.

I cut the flowers with my Big Shot and the Flower Folds Die. One of the greatest things about cutting fabric with your Big Shot, is that you can cut up to 8 layers at one time! So I only had to run the fabric through one time to get all 6 flowers. I sprayed them with fabric stiffener, crumpled them a bit and let them dry. Then I layered them, off setting them so I could see all of the cute patterns. I added a Designer Button with a bit of Baker's Twine tied in the center and hand sewed it to the bag.

I think it's just the perfect finishing touch!

Thanks for checking in today ~
dd

Tuesday, July 19, 2011

Flirtatious Canvas Bag

Today's project is a sewing project. I haven't sewn in forever! I literally had to dust off my sewing machine. I was so excited to get my Flirtatious Fabric. I ordered several others too! I have lots of other projects in mind I can't wait to do.

This was an ordinary canvas bag. I just added some ruffles to dress it up! Each fabric assortment comes with 3 coordinating designs in a fat-quarter size. That's 27"x18", plenty of fabric to create a variety of fun projects.

I cut 3" strips, hemmed them, gathered them up and sewed them on the bag. Then, even though the Melon Mambo Pom Pom Trim is discontinued, I couldn't resist adding it! I think I may even have to add some flowers or buttons. The possibilities are endless!

Have you been considering joining the Stampin' Up! family? Now through July 31, you can for just $99. You'll also receive an adorable Christmas Keepsake Project Kit for joining. Contact me for all the details.

Thanks for stopping by today ~
dd

Monday, July 11, 2011

Lots of Catching Up to Do

Now that I'm back from vacation & things have settled down a bit, I have a lot of catching up to do! The New 2011/2012 Idea Book & Catalog is awesome! If you don't have yours yet, just let me know, and I'll get one to you right away.

Along with the new catalog is a new Hostess Program. It too is awesome! When you host a workshop, you are no longer limited to just Hostess sets as your reward. You now earn Hostess Dollars that you can spend on specially priced Hostess Products, or anything in the catalog! When your workshop totals $400 you'll get to choose any item from the catalog for half price! The bigger the workshop, the more Hostess Dollars and the more half-priced items! Contact me to book your workshop today.

With the new catalog also comes a new incentive to fulfill your dream of becoming a Stampin' Up! Demonstrator. If you've been thinking about joining, now would be a great time ~

$99 Starter Kit and Free Project Kit Promotion


Dates: July 1-31, 2011

Promotion Details:
The limited-time $99 Starter Kit is the perfect choice for the lover of Stampin' Up! products. In addition to the supplies and business materials included in the kit, you will get a Christmas Keepsake project kit absolutely FREE--a $40 value! Remember, you can only earn this special Shelli Signature Collection kit during July!

Kit Details:
Contains over $185 in products and business supplies--including new products from the 2011-2012 Idea Book & Catalog! All items below are recommended, but a new Demonstrator can substitute a similar item of equal or lesser value.

Page
Item#
Description
57
123225
Easy Events Clear-Mount Set*
69
122740
Pennant Parade Wood-Mount Set*
177
102277
Old Olive Classic Stampin' Pad
177
105216
Pumpkin Pie Classic Stampin' Pad
177
103133
Real Red Classic Stampin' Pad
177
119706
Brights 8-1/2" x 11" Assorted Card Stock
180
101179
Basic Black Classic Stampin' Pad
182
107311
Whisper White Note Cards (20)
185
124339
Just Add Cake Designer Series Paper*
195
124142
Chocolate Chip 1/2" Scallop Dots Ribbon*
203
122129
Blender Pen (1)
205
118486
Clear-Mount Block C
206
104332
SNAIL Adhesive
*New to the 2011-2012 Idea Book & Catalog! All 4 items are shown in the photo above.

Business Supplies

No alternative selections can be made for business items.
  • Getting Started DVD
  • Getting Started Guide
  • Guest Invitation Postcards (100)
  • 2011-2012 Idea Book & Catalog (8)
  • 2011 Summer Mini Catalog (8)
  • Stampin' Up! logo vinyl
  • To My Hostess Envelopes (10)
  • Recruit Folders (5)
  • Recruit Brochures (20)
  • Customer Order Forms (50)
Christmas Keepsake Box Project Kit
  • The box included in the kit is limited to this kit.
  • Demonstrators and new recruits who earn a kit will be able to order it with their first Demonstrator order beginning August 1. Demonstrators and new recruits will have until September 30 to redeem their free Christmas Keepsake project kit.
  • Pines & Poinsettias Set (wood-mount)*New from the 2011 Holiday Mini
  • Keepsake box
  • Scallop borders (cut from Tasteful Trim Bigz XL Die)
    • First Edition Designer Series Paper (3)
    • Holly Berry Designer Series Paper (6)
  • First Edition Specialty Designer Series Paper strip (2)
  • Holly Berry Designer Series Paper piece*
  • Real Red Top Note (cut from Top Note Bigz Die)
  • Real Red Decorative Label (cut from Matchbook Bigz XL Die)
  • Wild Wasabi Card Stock strips (3)
  • Naturals Ivory Card Stock piece
  • Holly Berry Bouquet Designer Fabric*
  • Real Red 1-1/4" Striped Grosgrain Ribbon
  • Real Red 5/8" Grosgrain Ribbon
  • Victoria 5/8" Crochet Trim
  • Linen Thread
  • Champagne Fine Galaxy Stampin' Glitter
  • Vanilla Pearl 1/2" Simply Adorned Bauble
  • Pearl Basic Jewels (1 pkg.)
  • Holly Berry Bouquet Designer Buttons*
    • Large Wild Wasabi
    • Small Real Red
  • Mini Vintage Tags
Things to Remember

  • You may still purchase either the standard OR Digital+ Starter Kits instead of the promotional kit.
  • Recommended catalog products are included in the $99 Starter Kit. However, just like our standard and Digital+ Starter Kit, new recruits can select alternate items. For example:
    • An alternate stamp set of equal or lesser value.
    • An alternate color assortment of card stock of equal or lesser value.
    • Alternate colors of Classic Stampin' Pads of equal or lesser value.
  • Recruits can still add the Stampin' Memories, Definitely Decorative, or My Digital Studio Add-On to their $99 Starter Kit for the regular price.
  • Recruits who join Stampin' Up! by purchasing the $99 Starter Kit are still eligible for any programs available to new recruits. This includes, but is not limited to, the Extra 10% Instant Income offer, the newly refreshed Stampin' Start program, and the opportunity to purchase a Business Booster Kit.
  • The $99 Starter Kit is not available for purchase by active demonstrators. These kits are only available for new recruits.
  • Starter Kit order form deadlines:
    • Mail: Friday, July 29, 2011 (received in office)
    • Online: Sunday, July 31, 2011; 11:50 PM (MT)
If this sounds something you would like to do, let me know. We would love to have you join our team!

Thanks for stopping by!
dd