Stampin' Up! Independent Demonstrator ~ Debbie Dutchess ~ www.debbied.stampinup.net ~ debbiedutchess59@gmail.com

Friday, October 31, 2008

Reminders

Just a couple of reminders...

Today is the last day to order the Spooky Spider Decor Elements. It's also the last day to take advantage of the 20% Discount on select Birthday Stamp Sets, and the Aqua Painter special. Remember, we will be using several of these Birthday sets in our Stamp-a-Stack coming up on November 9. They are all really great sets, so if you think you need any of them, don't miss out on that 20% discount. Also don't forget that you can order any time online...you don't have to wait to contact me. You can order from the comfort & convenience of your own home. The deadline is midnight tonight for both of these special offers.

Here is a Birthday Card and a Cupcake Treat Box, using two of the sets that are being offered at a discount. This is the Crazy for Cupcakes set, and Simple Birthday Thanks. We will be using the Crazy for Cupcakes set on November 9. This is my favorite set from the ones that are included in this special.


If you want to make this card...contact me today to sign up for the Birthday Stamp-a-Stack on Sunday, November 9. We still have a couple of seats left!

Have a Safe & Happy Halloween!

dd

Wednesday, October 29, 2008

Snowflakes in October

Isn't this card beautiful! This is one of the cards that was made at our all night stamping event. It is 3 Dimensional. There are two layers of Night of Navy cardstock, with an oval cut out of the top layer. The sides are scored and folded and just the flaps are glued together. The snowflakes were cut with the Snowflakes Set #2 Die for the Big Shot. Look at the close up to see how pretty they are when covered with Stampin' Glitter. Two of the snowflakes are attached to Silver Cord and hang in the opening, the other is mounted behind them on the back layer of cardstock.

The swirl is from the Baroque Motifs set, and the Merry Christmas sentiment is from the Holidays & Wishes set. They were both embossed with Stampin' Silver Embossing Powder.


I have Jazzercise this morning, and a bunch of errands to run after that. My plan is to get a gift wrap project done to share with you tomorrow. It's another 6:00am day tomorrow at Pier 1, so I need to get as much done today as possible. There is one great thing about starting at six though, I get done early too, so the rest of the day is "my" time!


Enjoy "your" time today...see you tomorrow!


dd

Tuesday, October 28, 2008

Big Shot Ornament

I know I said I would share a couple of cards today, but I got the 3-D Circle Ornament Die for my Big Shot and just had to try it out. These are so simple! The large ornament was done with the Big Shot, and the small ones I made last year with the Scallop Circle Punch. The picture was a little boring with just the one ornament.


The Big Shot Die has 4 circles that you cut all at one time, and it puts the scoring lines on for you. The Double Sided Designer Series Paper, Ski Slope is what I used here, makes coordinating your papers a snap! On the large ornament, I strung the Silver Cord through the center before I attached the last circle. I used my Pretties Kit to make them a little more "pretty".


If you don't have a Big Shot...I know where you can get one! Or, you can order the Star Bright Designer Series Paper Ornaments Kit featured in the Holiday Mini Catalog. This kit includes enough components to make 54 stars, 6 paper strip globes, and up to 25 paper circle globes, depending on the size. The one here is pretty large, I used 20 circles. You can make them smaller. The kit also includes 12 Styled Silver Brads, and 10 yards of Silver Elastic Cord. You could also use this kit to make really cute package & tag embellishments!
You can see the entire Holiday Mini Catalog by visiting my website.


Thanks for stopping by!


dd

Monday, October 27, 2008

Wonderful Weekend

Good Morning! I had a wonderful weekend. I hope you all enjoyed it too. Scott was home, from working out of town all week last week, when I got home from work Friday night. Saturday was our anniversary, and we were going to go somewhere and stay the weekend, but we decided since he had stayed in a hotel all week that we would just take a drive Saturday. We headed west, and ended up at Raccoon Lake. Even though it was a bit dreary in the morning, we did see the sun peek out once in a while. We never take the beaten path when we go on our drives, and Saturday was no different. I always think of the saying "The excitement is in the Journey, not the Destination." The back country roads were beautifully lined with trees bursting in fall colors. I think this was a "grand plan", we have all of this beauty to take in and absorb before winter sets in. Although, there is a lot of beauty in winter too, if you can get past the frigid temperatures.
When we got home, we grilled steaks, and enjoyed a nice quiet dinner.

We had agreed on no presents, but Scott told me that he actually heard me mention something that I thought I would like, and he went out the next day and got it. He got me (us) a Wii, and the Wii Fit. He told me about his cousin who has the Wii Fit and said that it is really a great workout. I mentioned that I thought it would be fun. Well, now I know first hand that it is! We invited the kids and his parents over for dinner last night and played with the Wii. It comes with a sport game that has Baseball, Bowling, Golf, Boxing and Tennis. Then, after everyone left, we tried some of the "Fit" exercises. There was a "step aerobic" routine that I think I worked my abs more, laughing at Scott trying to follow along.

I have to work today, so I may not have time to post a project. I will share a card or two tomorrow.

Thanks for stopping by today. Enjoy this last week of October!

dd

Friday, October 24, 2008

Count Down to Christmas Calendar

Oh my! I did something this morning that I rarely ever do...I slept in! Can you imagine my surprise when I opened my eyes to see 7:45 am on the alarm clock? I think it has a lot to do with the fact that Scott has been working out of town all week, so I have been staying up way too late, and it is dreary and rainy today. It still wasn't completely light out at 8:00 am this morning.

Well, are you ready...drum roll please...here is the cutest "Countdown to Christmas Calendar" that I'm sure you've ever seen. Can you tell I'm really proud of this project? It did take some time, another reason I stayed up way too late last night...or climbed into bed too early this morning. It's really not as hard as it looks. Now that the planning is done...picking just the right patterned paper, arranging the colors so they are just right, and figuring out what embellishments to put where. Sometimes I am way too picky about those things, so it takes me a while to get everything "balanced". My mom says I'm a perfectionist, but in what I do, I think that's a good thing. This turned out so cute, that I'm glad I took the extra time.

Okay, okay...stop typing and just show you right? Here it is!

See why I am so proud of this project...isn't just too "stinkin' cute"?

The box measures 8-1/2" wide by 8-1/8" tall, and each little box is about 1-1/2" square.

The box is not Stampin' Up!, but all of the stamp sets & embellishments are. I'm not even going to try to list all of the products that I used to create this, so if you are curious as to what something is, just leave me a comment to this post, and I will be happy to answer any questions.


I just realized that the other picture doesn't enlarge when clicked on, so I added these close ups. Hopefully this will help. I'm still a bit computer challenged.


Tomorrow is our 33rd Anniversary, so we are going away this weekend to spend some time together and leave all the worldly troubles behind.
Thanks for visiting today!


dd

Thursday, October 23, 2008

Good Afternoon!

Just a quick post today. I had to be to work at 6am this morning, so I didn't have time to share a project with you. But, I'm going to make up for that tomorrow. I am working on an adorable "Count Down to Christmas Box"...are you getting excited...I sure am...can't wait to share!


Also, a couple reminders:
The Birthday Stamp-a-Stack class is just about full. If you are interested in joining us for this Sensational Day of Stamping, please contact me as soon as possible.


There are only a few days left to order the select Birthday Sets at 20% off with a regular $20.00 purchase. We will be using these sets in class. They are all adorable! You can go to my website and click on "Shop Now", and then "Specials" to see these sets. There is no limit to the number of sets you can order at the discounted price once you order $20.00 regular merchandise.


The Spooky Spider Decor Elements will also be going away in a few short days.


Both of these promotions end Friday, October 31. Let me know if any of these things are things you just can't live without!


Off to finish the box. See you tomorrow!


dd

Wednesday, October 22, 2008

Envelope Box

No, it isn't a box to keep your envelopes in. It's a box made from the Scallop Envelope Bigz Die. This is an adorable little box created by assembling four of the Scallop Envelopes. These would make great party favors, teacher gifts, or a thanks for being my friend gift.

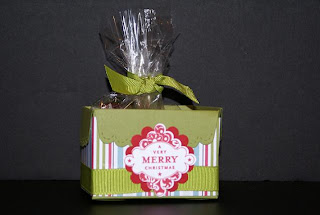
I used the Big Shot to cut the 4 envelopes from Old Olive cardstock. When assembled, the box measures 3-1/4" wide by 2-1/4" high. The stripe is from the Designer Series Paper Ski Slope, which can be found in the Holiday Mini Catalog. The Very Merry Christmas Scallop Square is from the Level 1 Hostess Set, Punches Three. I wanted to highlight the square so it would stand out, so I layered the Scallop Circle behind it in Real Red. Here is another picture so you can see what is inside the box.

I also wanted to remind you that we only have 5 spots left for our Birthday Stamp-a-Stack scheduled for Sunday, November 9, from 11-3. If you haven't registered yet, contact me today so you don't miss out! Some of the cards we are going to do are in the picture from our all night stamping event.

Thanks for stopping by, and have a great day!

dd

Tuesday, October 21, 2008

Season of Thanks

Season of Thanks, Season of Blessings, Season of Love.

I know it's still October, but why wait to express our thankfulness. It's something I feel that we do all year long, but we really seem to stop and think about it at Thanksgiving time. Especially when we are gathered with our families enjoying the time we have to share with them. I have so much to be thankful for, I could list something everyday of the year and still have much more to add to that list.

I wanted to share one of my latest projects with you. This is one of the New Decor Elements from Phase II. Season of Thanks comes in two sizes, and three colors. This is the small black one applied right to the outside of the glass of a shadow box frame. I filled the shadow box with fall flowers, leaves, pinecones and acorns for a very festive look.

You can see all of the Decor Elements on my Demonstrator website. If you like what you see, you can order immediately, online and have your order delivered directly to you just in time for the Holidays!

I am Thankful for all of my friends who stop by to visit me each day & share in my joy of Stampin' Up!

dd

Monday, October 20, 2008

Stampin', Stampin', Stampin'!

My "favorite Daughter-in-Law with brown hair" sent me an email with "stampin', stampin', stampin'" as the subject line, and I thought it was the perfect title for today's post...thanks, Andrea!

That is exactly what we did Saturday night! Here is the pile of most of the projects that we did.
I picked Loretta up at about 7:30 Saturday morning. We stopped at Starbucks for some energy for the road trip, and were on our way. It was about a 4 hour drive, but we gained an hour because of the time difference. Great...more stamping time! We were actually the first ones to arrive at the hotel...and we travelled way farther than anyone else. We immediately started setting up the room, rearranging tables and bringing all of our stuff in.
Everyone else arrived shortly after us, and Phyllis even stopped at Subway and brought us lunch. Great...we can get eating out of the way and then start stamping! We all shared our samples, ooohing and ahhhing over them all, and decided which cards/projects that we wanted to make. Great...let the stamping begin! And that it did! We had so much fun! You can see in the picture that we got a lot accomplished. I didn't count the number of cards/projects, but they almost covered my kitchen table. It is always great to get together with other Demonstrators to share tips, techniques, class and business ideas.
We were in the "Breakfast Room" at the hotel, and the Night Manager came in at one point and told us that he started preparing the room for breakfast at about 5:30 each morning. We commented that that wouldn't be a problem, we would be done long before then. Well, after stampin', stampin', stampin', we packed up our stuff, cleaned up the room, and climbed into bed at 5:00am Indiana time. We stamped for 17 hours!
Thanks for checking in!
dd

Friday, October 17, 2008

All Night Stamping Party

I've been looking forward to this weekend for a while. I will be going to Illinois tomorrow to an all night stamping party. This is the same group of ladies that travelled to Indy for our quarterly Stampin' Up! meeting in August. We all got together with our supplies to stamp and share new projects and ideas. We had such a great time, and came home with loads of new samples and fabulous new project ideas that we can then share with you. With the holidays rapidly approaching, I am very excited to see what everyone has come up with.

I have a large family...3 brothers, and 3 sisters. Between the 7 of us we have 18 kids. There are 6 great grand kids, and 1 more on the way. My sister just got married, and now has 2 step sons. Then add our 7 spouses, and 7 more spouses with the grand kids who are married...and let's not forget there's a few boyfriends and girlfriends in there as well...anyway, you get the idea. I haven't done the math in a while, so I'm not sure what that totals, but I know it's a lot!

My whole reason for telling you all this is that we all take turns hosting Christmas Eve. This is my year, and my plan is to be very creative with my holiday wrapping. I think my family actually expects that now. We no longer buy for everyone, since we can't even keep track of how many of us there are, but we do each bring a gift, and do an exchange. We put all of the gifts in the center of the room, and draw numbers to determine who gets to choose the first gift. I like to entice the recipient with creative wrapping. I have actually done some Christmas shopping, and have some ideas to avoid just putting each gift in a box and wrapping it in ordinary wrapping paper. In the next few weeks, I will share some of those ideas with you. Here is one gift bag idea to get you started.

I love snowmen! This bag is really easy to create. The snowflakes are randomly stamped with White Craft Ink on the bag first. Then, depending on the size of your bag, this one is 8 x 10, cut a square from red cardstock. Then layer a white square on top of that. The eyes and mouth were made using the 3/4" circle punch and highlighted with the Signo White Gel Pen. Crimp a piece of orange cardstock and tear to create his carrot nose. Use a Sponge Dauber to make some rosy cheeks, add some ribbon, and you're done!
A nice addition to this Snowman Bag would be to use a Stampin' Wheel and create your own coordinating tissue paper.
This adorable Snowman would definitely stand out and be the first package picked from the pile of exchange gifts.
I won't be posting over the weekend, but I will be stamping! Check back on Monday, as I'm sure I will have some great new projects and ideas to share with you.
Have a wonderful weekend, and enjoy all those marvelous fall colors!
dd
p.s. The pictures from Alaska were amazing! That is one place that I hope to see someday.

Wednesday, October 15, 2008

More Cute Spiders

Okay...I think I've said the words cute & spiders more in the same sentence in the last few weeks than I have in my entire life, or probably will again...until next Halloween.

I must say SU Demonstrators are incredibly creative. I can not take credit for these "cute spiders". I'm not sure where the idea originated, but it has been going around a lot of sites, and I couldn't resist.

These little guys were created entirely by using punches. The Scallop Circle Punch is the perfect size to cover a York Peppermint Patty. Wouldn't these be adorable setting around the tables at a Halloween Party? Or, fill a Ghostly pinata, and have them spill out all over the ground when it's busted open. Oh, the possibilities...

My parents have just recently returned home from an eight week driving trip to Alaska. They are coming over for dinner tonight to share their 3911 pictures, and tell us all about their trip. So, I have a busy day. Jazzercise this morning, banking, grocery store, pick Makayla up from school, and I will be cleaning...you know how you always feel like you have to do a little "extra" when your Mom comes to visit. I will also be cooking...which I love...but don't do a lot any more now that it's just me & Scott at home. Well, better get started...

Thanks for checking in today!

dd

Supplies: Scallop Circle Punch, Photo Corner Punch, 1/4" & 1/2" Circle Punch

Tuesday, October 14, 2008

BOO!

Here is the Halloween project that I told you about using the Big Shot Bigz Pennant Die. This pennant is a little large for my bucket, but this was the best way to photograph it. There are two different sizes of pennants, and 4 scallop circles, all one size, on this die. The small pennant is about 5 inches, and the large one is about 9 inches. The scallop circles are the ones I showed you yesterday, that layer perfectly behind the Scallop Circle Punch.


The large scallop circle on the pennant was cut with the Big Shot as well, as was the word "BOO". This is the Serif Essentials Alphabet Die Set. These letters are about 2 inches tall, great for titles for your scrapbook pages. The Scallop Circle measures about 4-1/4 inches. This is the perfect size to layer on the Carousel Notes.


The little Pixie Stix toppers were done using the Batty for You stamp set. Isn't nice how their colors coordinate so well with the SU colors!

I got my bucket at Target a few weeks ago. I'm not sure if they still have them. They had a couple different colors and designs. This one came with the word "boo!" already on it, but you could use a rub-on to create your own.

Here are a couple of close up pictures, so you can see more of the details.


Have a Terrific Tuesday!
dd

Monday, October 13, 2008

Thanksgiving Card

I finally have a card to share with you today. This working thing is really getting in the way of my stamping. Somehow, I got scheduled to work 7 days in a row. They were only short days, but it made it difficult to get many extra-curricular activities done. It actually made it hard to get my normal everyday things done...laundry, cleaning...you know. Anyway, enough whining. I was planning on sharing a Halloween project, but it's not quite ready, so I moved on to Thanksgiving. Later this week, we'll jump back to Halloween.

This card uses the Designer Series Paper Autumn Vine that can be found in the Holiday Mini Catalog. The stamped image is from the set Wanted. I found a quick & easy way to get multiple colors on your stamp. Ink up your image as normal, starting with the lightest color. I used More Mustard here. Then, with your Stampin' Write markers you can color right over the top of the parts that you want different colors. I used Really Rust and Chocolate Chip to coordinate with the printed paper. I wanted a more natural look, so I used the Twill Ribbon as an accent, and tied the knot with Mustard Grosgrain Ribbon. The Happy Thanksgiving saying is from the Holidays & Wishes stamp set.

I punched out the stamped image with the Scallop Circle Punch and cut the Chocolate Chip layer with my Big Shot using the Pennant Bigz Die. Check back tomorrow for my Halloween project using this same die. This is one of the Big Shot Dies designed exclusively for Stampin' Up!

We only have 6 spots left in our Birthday Stamp-a-Stack scheduled for Sunday, November 9. Don't miss out on this great class. Contact me today to reserve your seat.

Thanks for stopping by today!

dd

Friday, October 10, 2008

A Couple Announcements

There are only a couple more days to take advantage of the 3 different Starter Kits for only $99.00. Or, select the Standard Starter Kit, and get a FREE stamp set of your choice from the 2008 Fall/Winter Idea Book & Catalog. If you are interested in becoming a Stampin' Up! Demonstrator, check out these great deals. Click on the picture on my sidebar for more details, or contact me today!


It's Stampin' Up!'s 20th Birthday & they're throwing a party! From now through October 31, when you spend $20.00 in regular catalog merchandise, you can get a 20% discount off select Birthday stamp sets. Click on the picture on my sidebar, or visit my Stampin' Up! website, to see which sets can be purchased at a discount.
We will be using the Party Hearty and Crazy for Cupcakes sets for the Birthday Stamp-a-Stack. If you would like to have your own set to use during class, place your order now and get 20% off! There is no limit to the number of sets you can order with the 20% discount.

Remember the Spooky Spider? He is only going to be hanging around
for little while longer. This little guy comes in black or white, and 3 different sizes, and coordinates with the Ghostly Greetings Designer Series Paper and the Chills & Thrills Rub-Ons in the 2008 Fall/Winter Idea Book & Catalog. Once again, click on the picture on my sidebar
for more details, or visit my website. But, be sure to check it out soon, because after Halloween, he'll vanish into the night with all the other spooks.
Thanks for stopping by...
Have a Fabulous Weekend!
dd

Thursday, October 9, 2008

4 Seasons Frame

Here is the Special Project that is now a class!

This is my "4 Seasons Frame". It was hard to take a picture, since this is in a frame with glass. I kept getting reflections from everything...this was the best one. This set was "Love at First Sight"! When I turned the page in the Holiday Mini and saw it, I couldn't wait to get it ordered and start using it.

I was inspired again, by the sample in the Holiday Mini, but I wanted to include all 4 seasons. I found the perfect frame, long before I even had the stamp set in hand. I am extremely happy with the way it turned out, and can't wait to hang it in my home.

If you want to join me for this class just contact me to let me know. The class fee is $25.00 and includes the frame and all stamping supplies. Be sure to let me know in advance, if you are interested, so I can have plenty of frames. I am still working on the date. Several people would like to do them for Christmas gifts, so it will probably be early November, on a Saturday, or Sunday, depending on what works best for everyone.

Hope you're having a wonderful week!

dd

Wednesday, October 8, 2008

Christmas Card Stamp-a-Stack

I finally have pictures of a couple of cards that we did on Sunday at the Christmas Card Stamp-a-Stack. These are just 2 of the 10 cards that we made. The first card uses one of my favorite sets, Lovely as a Tree, and the Top Note Die cut with the Big Shot.


The ribbon is Kiwi Kiss, and then, to add just a little glitz, we used the 2-way Glue and Dazzling Diamonds to make the snow sparkle.


This card was made with the Scandinavian Season set that is available now through January 18, in the Holiday Mini. I love everything in the Holiday Mini, but this is one of my most favorite sets! I actually used the sample in the mini as my inspiration. The printed paper is from the Designer Series Paper Ski Slope, also in the mini, and the ribbon is the new Taffeta, Riding Hood Red. This set is great because the stamps are so detailed, you don't have to add a lot of embellishments, and you still have a very elegant card. I can't wait to try embossing with this one!

I have a special project to show you tomorrow, that I had on display, and everyone wanted me to teach "the class" so, I'm doing the class! It's using another one of my favorite sets from the Holiday Mini, Season of Friendship. Check back tomorrow to see what it is.

Until tomorrow...

dd

Tuesday, October 7, 2008

Stamp-a-Stack HUGE Success!

First of all, I want to apologize for being MIA. Then, I want to thank everyone who attended our World Cardmaking Day, Christmas Card Stamp-a-Stack class this past Sunday...one of the reasons I have not had a chance to post here. We had a full class of 16! Which means that Loretta and I prepared kits for 320 cards, and 160 tags! Don't get me wrong, I absolutely LOVED doing it! I do think I am going to invest in a paper trimmer that will cut more than one sheet of cardstock at a time though. Especially if we have this great response to all of our classes from now on.

We had a stamp-fastic day! We had 5 stations set up with 2 to 3 cards at each station. Everyone was able to work at their own pace, and rotate stations until they completed all of the cards. We had new stampers as well as veterans, and I think this was a great way for everyone to get to visit with one another, and help each other along the way.

Before the day was over, (actually, even before lunch), everyone was asking when the next class was going to be. Well, with the success of this one, we have decided to do a similar class focusing on Birthday Cards. We will do 15 cards this time, and a Gift Card Holder. This will be in conjunction with the Birthday Special that Stampin' Up! is offering. Click on the flyer on the sidebar for more information.

We limited this last class to 16, and decided that we have room for a couple more. So, we can seat 18 for the Birthday Card Class. If you are interested, contact me soon. We already have a few spots filled. Our Christmas Card class filled very quickly!

Birthday Card Stamp-a-Stack, Sunday November 9. We have also decided to start at 11:00am, and several ladies suggested that instead of us feeding everyone, that everyone attending bring a snack/food dish to share. We will provide chips & drinks & chocolate. Gotta have chocolate! The cost is $25.00. That works out to be $1.56 per card/gift card holder.

I will work on pictures today from the class this past Sunday, and post them tomorrow, so you can see some of the things that we did.

Have a Wonderful Week!

dd

Thursday, October 2, 2008

October Promotions

Wow! I am delighted to say that our Christmas Card Stamp Camp is full! I have had so much going on the past couple of days, I just couldn't do everything I had on my "to do" list. One of those things was posting here. I have a lot of information to share. There are several great promotions.

The first one being that you can now order from the Holiday Mini. Stampin' Up! has out-done themselves once again. For such a small catalog, there are so many great stamp sets & accessories. The best thing is you have until January 18, 2009 to get everything you want. If you need a copy, let me know and I'll get one to you right away. In the meantime, you can click on the picture on the sidebar and go to my website to check it out.

Still going on this month only is the limited time only Spooky Spider Decor Elements. I'm not big on spiders, but I just had to have this one. He is so adorable guarding my huge jar of candy...he hasn't kept me out of the jar though. Again, click on the picture on the sidebar for more information.

Next, is the World Cardmaking Day promotion. We have combined our cardmaking day with our Christmas Card Stamp Camp. Stampin' Up! is offering a 20% discount on the Simply Sent Card Elements and Simply Sent Card Kits beginning October 4 thru October 11. These kits contain the elements you need to create fun & exciting cards. Photos and instructions are included. The coordinating stamp sets are sold separately. You can check the kits out on pages 176-177 in the Fall/Winter Idea Book & Catalog, or visit my website.

Phase II Decor Elements are now available! You are going to love these! There are some for Thanksgiving, Christmas, the Nursery, basic Home Decor, and wait till you see the Ginormous Flowers! I think Makayla needs these for her new bedroom. Once again you can see them on my Stampin' Up! website.

Last but not least...I think. In celebration of Stampin' Up!'s 20th Birthday, they are throwing a party! When you spend $20.00 on regular catalog merchandise, you will get 20% off select birthday stamp sets. There are some really fun sets included in this special. You can be assured that I'm going to take advantage of this one! Once again, visit my website for the list of stamp sets. Included in this promotion is a special offer on a Single Large-Tip Aqua Painter. Many of the stamp sets included in this offer lend themselves to being "colored" in. You can purchase the single aqua painter for $7.25 while supplies last. The aqua painter is usually sold in a 2-pack for $16.95, so if you've been considering this item, now would be a great time to get one.

There is one more promotion. More Rewards! When you Host a Workshop of $350.00 or more from October 1 thru November 30, you can choose any stamp set from the Catalog Sampler FREE, In addition to your regular Hostess Benefits.

If you are considering becoming a Stampin' Up! Demonstrator, you can choose any stamp set of you choice FREE from the Catalog Sampler or the Fall/Winter Catalog, when you purchase the Standard Starter Kit for $199.00 from now thru October 11.

Okay, I think that's it for now. That should give you enough to think about until tomorrow. Contact me if you have any questions about any of the promotions that are currently in effect. Believe me, I know it can be a bit overwhelming! Don't forget, you can order any time on-line by visiting http://www.debbied.stampinup.net/.

Have a Great Day, and check back tomorrow for a little sneak peek of our Christmas Card Stamp Camp projects.

dd