Stampin' Up! Independent Demonstrator ~ Debbie Dutchess ~ www.debbied.stampinup.net ~ debbiedutchess59@gmail.com

Tuesday, March 29, 2011

For You

We are down to the last 3 days of Sale-a-Bration! I can't believe how fast this time has gone by. Have you gotten all the Free stuff you wanted? I still have a couple of things I need, so I'll be placing my last personal Sale-a-Bration order tomorrow. Let me know if you need anything. I'd be happy to help you earn Free products too!

Today's card features a couple of the items you can get for Free during these last couple of days of Sale-a-Bration. The Punch Bunch Stamp Set, Ice Cream Parlor Designer Series Paper Pack & Quick Accents Pack, and the adorable buttons from the Ice Cream Parlor Ribbon & Button Pack.

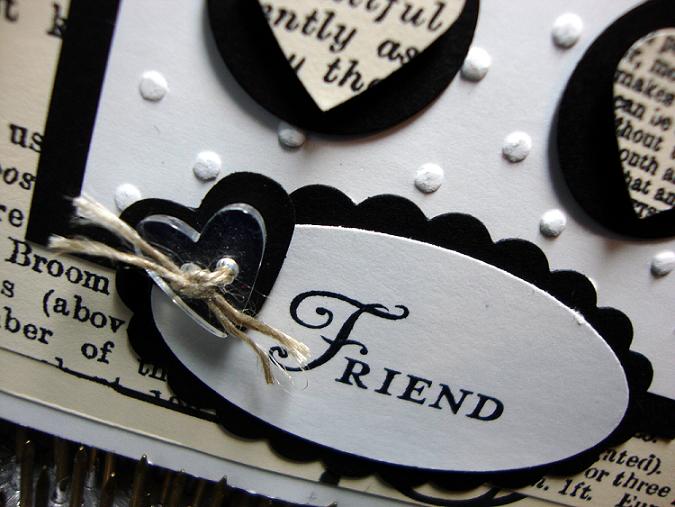
The Punch Bunch Set is great! Each of the 5 stamps coordinates with a punch. I've used the 1-3/4" Scallop Circle Punch to punch out the stamped image and layered that on to the Old Olive 2-3/8" Scallop Circle. The Flower Strip and Scallop Border are from the Quick Accents Pack. These are self adhesive die cuts that are great for cards or scrapbooking. You get 2 12x12 sheets of die cuts with tons of designs, along with 9 sheets of double sided DSP in this pack. I've used one of the papers here. To add some texture, I ran the DSP through my Big Shot with the Square Lattice Embossing Folder. I really love this technique! Lastly, I added the Ice Cream Parlor Buttons from the Ribbon & Button Pack, which coordinate with the DSP & Accent Pack.

There's also just 2 days left for my Big Shot Special. If you've been considering making that purchase, now's the time. You can earn lots of free Sale-a-Bration products, plus I am offering a Textured Impressions Embossing Folder of your choice ~ My gift to you! Click on the link above for all the details.

Thanks for stopping by today!
dd

Wednesday, March 23, 2011

My First Tutorial

As promised, here are the step-by-step instructions for the Gift Bag that I shared with you yesterday. I hope I've done this so you can figure how to make them. They really are very easy, and I'm sure once you make one, you'll have no problem making many more! Here goes ~

All you need is one sheet of 12x12 Designer Series Paper or Cardstock, and whatever you want to use to decorate your Gift Bag.

Score your 12x12 sheet of paper at 1", 3", 6", 8" and 11". From the bottom edge, score at 2".

Fold on all of your score marks. From the bottom, snip on all score marks up to the 2" score line, and cut out the two 1" corners.

Fold in the 1" sides and add Sticky Strip to one side. Adhere together by folding in half, forming rectangular bag. You will have the access 1" flap on inside of bag. Just press to one side.

Add Sticky Strip to inside of one of the larger flaps of bottom of bag. Fold in 2 smaller flaps first, then larger flaps, the one with Sticky Strip last.

Pinch top together closing with Library Clip or closure of your choice. Decorate as desired!

Here's a picture of today's finished bag. Now go have fun and create some adorable gift bags. Leave me a comment, I'd love to see what you come up with!


Thanks for stopping by today!
dd

Tuesday, March 22, 2011

Springtime Vintage Gift Bag

Today's project is an adorable gift bag. This is made from one sheet of 12x12 Designer Series Paper. They are so easy to make! I will post a tutorial (my first!) tomorrow with step-by-step instructions. Once you make one, you'll want to just keep on making them. You can decorate them for every occasion. With Easter & Mother's Day just around the corner, I know I'll be making several!To decorate the front, I've used my Big Shot and the Bigz XL Flower Folds Die. For the flower center, I used the 1" Circle Punch to punch out a piece of patterned paper, a Clear Button (retired), and tied a knot with the 1/8" Very Vanilla Taffeta Ribbon. You could also use the Big Designer Buttons that coordinate with the Springtime Vintage DSP. Any larger button or brad will work for the center of the flower. For the stem, I just cut a thin strip of Certainly Celery Cardstock, and punched the leaves with the 2-Step Bird Punch. These would be the wings if you were actually using it for the bird.


The tag was created by layering the Decorative Label Punch and the Scallop Oval Punch. The sentiment is from the Bring on the Cake Stamp Set found in the Occasions Mini. I've used a Small Library Clip from the Clip Assortment, to close the bag and tied a bow using the Rose Red Seam Binding Ribbon.

Don't forget, there's just a few days left of Sale-a-Bration. Contact me if you'd like to place an order & earn Free stamps.

Thanks for stopping by!
dd

Friday, March 18, 2011

***Big Shot Special***

We are counting down the last few days of Sale-a-Bration. Don't miss your chance to earn Free products. It's so easy! I'm sure you have a few things on your Wish List, why not get them now, and get something Free too! Have you been considering purchasing the Big Shot? Well, I have an Impressive Deal for You!

Starting today through Wednesday, March 30, when you purchase the Big Shot Machine ($99.95) and any other Big Shot Dies or Accessories totaling $50.05 or more, bringing your merchandise total to $150.00*, I will throw in a FREE Textured Impressions Embossing Folder (your choice, a $7.95 value). Now, since this is Sale-a-Bration, that's not all you'll be getting for FREE. This order will also qualify you for 3 Sale-a-Bration products of your choice. (a $35.85 - $44.85 value). And, that's not all yet! You will also receive a Level 1 Hostess Gift, and $15.00 FREE product of your choice from any current catalog! You will also get personal training and unlimited answers to any questions you may have concerning your new Big Shot ~ value ~ priceless!
*s/h of $15.00 and tax will be added to merchandise total.

Whether you are a Card Maker or avid Scrapbooker, the Big Shot Machine and Accessories is the perfect cutting tool for every project. The machine comes with the Standard Cutting Pads and Multipurpose Platform so you can start creating right away!

This is my own personal special offer and cannot be ordered online. Please contact me directly to order your Big Shot today and start Impressing all your friends and family!

Thanks for checking in today!
dd

Thursday, March 17, 2011

Shades of Green

I don't have any St. Patrick's Day stamps, but I saw this card that a fellow Demonstrator had done, so I thought I'd give it a try with green for the occasion. The colors are a bit off here, I couldn't seem to get a very good picture. Green really isn't one of my most favorite colors, but this didn't turn out too bad. I'm sure it would be much prettier in pinks, reds or blues.

I used the Circle Circus Stamp Set to stamp the images on Certainly Celery, Pear Pizzazz, Wild Wasabi, and Garden Green Cardstock with their coordinating Classic Inks. The sentiment is from the Something to Celebrate Stamp Set. This is the Level 2 Hostess Set available in the Occasions Mini Catalog. I chose Black Taffeta Ribbon and added a few Basic Rhinestones as a finishing touch.

I hope you're enjoying your St. Patrick's Day! Thanks for checking in ~
dd

Monday, March 14, 2011

Inspiring Weekend!

We had our Spring meeting this past weekend with several Demonstrators in our group. I always look forward to these days. My upline lives in Iowa, but has family here. She plans these meetings when she's going to be in town and it's so great to see her and other Demonstrators in the area. We usually discuss business first, have some technique demonstrations, and then we get to stamp! Each Demonstrator designs a card and brings enough supplies for everyone else to make it. It's so much fun to sit down and leisurely stamp cards that someone else has designed!

Here's the card that I designed. This is the Clearly For You Stamp Set. This is the set that we got when we went to Leadership. It's definitely one of my most favorite sets right now!

I stamped the floral block design 3 times across the bottom with Marina Mist Classic Ink. The Old Olive Scallop Dotted Ribbon Border is lined up across the top of the stamped image. Then I layered the Very Vanilla Cardstock over that leaving only the bottom of the scallop showing. I used a strip of Cherry Cobbler Seam Binding Ribbon tied with Linen Thread and a Clear Bitty Button to finish it off.

Don't forget, there's only a couple more weeks to take advantage of Sale-a-Bration. For each $50 you spend, before s/h & tax you earn a Free Sale-a-Bration product. Or Host a Workshop to earn even more! Contact me for more details.

Thanks for stopping by today!
dd

Thursday, March 10, 2011

Happy Birthday Bottle

I just love these little bottles! They are so much fun to decorate. I filled this one with crushed shells that I found at our local craft store. They coordinate perfectly with the Blushing Bride Cardstock.

I cut a butterfly with my Big Shot and the Beautiful Butterflies Bigz Die. It's hard to see here, but I tied a piece of the Chantilly Lace Crochet Trim around the butterfly and tied it in a knot to create it's antenna. The banner is from the new Petal Cone Die found in the Occasions Mini. I used my Bone Folder to distress it and make it curvy. It also separated the layers a bit on the ends and created a nice effect. The saying on the banner and the sentiment are both from the Messages For Mom Stamp Set.

Another effect that you can't see in this picture, is that I've stamped the floral image from the same stamp set in Versa Mark on the butterfly. This just adds a very subtle design to otherwise plain cardstock. I've also added a Vanilla Rosette, also found in the Occasions Mini, a Rhinestone in the middle of the rosette, and tied on a Trinket Key with the 1/8" Early Espresso Taffeta Ribbon. Here is a close up of those details.

Thanks for stopping by!
dd

Tuesday, March 8, 2011

Friend

I was playing around with Black, White and Very Vanilla today, and this is the card I came up with. I Love black and white, but the Newsprint DSP is Basic Black and Very Vanilla, so I thought I would use all three! I really like the way it turned out.

I knew I wanted the base of the card to be white. Then I picked two different patterns from the Newsprint DSP and layered them. I had to add some texture, so I did that easily by using my Big Shot and the Perfect Polka Dot Embossing Folder. I searched the small print for words that I liked and punched them out with the Small Heart Punch and layered them on black circles I punched with the 3/4" Circle Punch. I adhered them with Stampin' Dimensionals to make them really stand out.

The word Friend is from the You're a Gem Stamp Set found in the Occasions Mini. I wanted it to be very crisp and clean, so I stamped it with my Black Stazon Ink. I punched it out with the Wide Oval Punch, layered it on the Scalloped Oval, punched a black heart and added a Bitty Heart Button tied with Linen Thread as the finishing touch.

I hope you enjoyed today's card ~ Thanks for checking in!
dd

Monday, March 7, 2011

Amour

Wow! I know February is a short month, but geesh what happened! I went on a short vacation, had a bout with some migraine issues when I got back & now it's already the second week of March! I definitely have some catching up to do.

I do feel the "Love" and appreciate you checking in and leaving comments even though it's been over a month since I've shared a new project with you. The card I have today is one I've been admiring in the Occasions Mini Catalog. I love every element about it! The new Framed Tulips Embossing Folder, Beveled Windowpanes, Trinkets, Seam Binding, Stamping on DSP, and the Clearly For You Stamp Set!

Here is a close up of the detail of the Beveled Windowpane. All of the images are stamped and layered under the windowpane. There are pre-made slots all ready for you to tie your ribbon through to attach it to your card or scrapbook page. These come in 3 sizes. This is the largest, 1-1/2" x 2".

Don't forget that Sale-a-Bration is still going on through the end of March. For every $50 you spend (before s/h and tax) you earn a Free Sale-a-Bration product. There's still time to host a workshop & earn even more! Contact to schedule today.

Thanks for stopping by!
dd