Stampin' Up! Independent Demonstrator ~ Debbie Dutchess ~ www.debbied.stampinup.net ~ debbiedutchess59@gmail.com

Friday, November 28, 2008

Country Living Holiday Collection


WOW!

I just received my Country Living Holiday Collection Stampin' Kit. It's amazing! There is so much product included in this kit. I can't wait to start making my Decorations, Ornaments, and Tags. The Die Cut Designer Series Paper makes it so easy to create the wonderful projects shown. Not only do you get enough product to make several different projects, there are Instructions with Diagrams, and Tips to help you achieve the best results. Try adding a few Rub-Ons, on sale right now through November 30, with a $20.00 purchase, to create your own unique Holiday Decor. You can order your kit today, on line, by visiting my website. You can also see the complete list of supplies that comes in this amazing kit. Remember, it's only available for purchase through December 31, 2008.
Check back on Monday to see what I've created with my Country Living Holiday Collection Stampin' Kit.
Thanks for checking in today!
dd

Wednesday, November 26, 2008

Holiday Extravaganza Sale!

Just in time for your Holiday Shopping!

This is a very limited time offer. Starting today, November 26-December 1, Stampin' Up! is offering a 20-50% discount on select product bundles. Quantities are limited, so to insure that you get the things you want, please place your orders online by accessing my Demonstrator Business Website at http://www.debbied.stampinup.net/.

The Stampin' Up! offices will be closed Thursday & Friday in honor of Thanksgiving. To minimize the risk of the discounted bundles you need, no longer being available, order online early!


Have a Safe and Happy Thanksgiving!

dd

Tuesday, November 25, 2008

Jingle All The Way

I Love this project!

This is a 16" ceramic tile that I bought at Lowe's, and the Large "Jingle All The Way" Decor Elements. It was so easy to adhere the Decor Elements to the tile. It has a bit of a textue, but I had no problems. Of course, I couldn't just leave it at that, so I sponged Real Red ink on the edges of the tile, and around the design. That was just a little too bright, so then I sponged Encore Gold Ink over that to tone it down just a bit. The Encore ink is a pigment ink, so I had to heat set it. Just be careful not to melt the Vinyl Decor Element. It really is prettier in person, the picture doesn't do it justice.

There are several Holiday Decor Elements that come in various sizes and colors. Check them out at my Stampin' Up! website.

I know you are all very busy during this Thanksgiving Weekend, but, you'll definitely want to make time to...

Check back tomorrow for a Very Limited-Time Discount Offer On Select Product Bundles From Stampin' Up!
"Thanks" again for stopping by!
dd

Monday, November 24, 2008

Pink Snowflakes

Brrrrr! With this cold weather, it makes me think that it won't be long till we get some snow. Call me crazy, but love the snow! Last week when we had those little flurries here & there, it actually made me happy. I think it makes everything look so clean and peaceful, when the ground is covered with the sparkly white blanket. Maybe living in Indiana all my life, I've just resigned myself to the fact that we are going to have snow, so I just make the best of it and enjoy it's beauty.

My friend made this card for our Christmas Card class that we had in October. I Love the Pink Snowflakes. It's so sweet & delicate. This is one of the In-Colors, Pink Pirouette, and the Snow Burst stamp set. She tore the bottom of the Whisper White cardstock and inked the edges so it would blend with the pink cardstock. The Holiday Greetings sentiment is from the Sincere Salutations stamp set.

I can't believe it's Thanksgiving week...
I hope you all know how thankful I am that you take the time to stop by and check out what's going on in my little studio.

Smiles to you all!

dd

Saturday, November 22, 2008

Limited-Time Offer

Just a quick post today to let you know that Stampin' Up! has another great special coming your way! I don't even have all of the details yet, but I wanted to let you know to make sure you take the time to check my blog on Wednesday for the announcement! I do know that it is a very limited-time offer. This special will only run for 6 days, and involves on-line ordering. It will start on Wednesday, November 26 and run through Monday, December 1. You can check out the details here on Wednesday morning, or go straight to my Demonstrator website.

I am anxious to find out the details...and share them with you!

Have a Great Weekend.

dd

Friday, November 21, 2008

Leafy Wreath

The idea for this project came to me as I was working on orders for the 4 Seasons Frame. I guess my mind was wandering as I was stamping the leaves on the trees, and I thought, oh, I could use these leaves to make a wreath. So, I did! I think it turned out pretty cute.

The leaves are from the Season of Friendship stamp set that can be found in the Holiday Mini Catalog. I punched a 1 inch circle out of scrap paper to use as a guide and stamped the leaves around it to form the wreath shape. To add the berries, I used small dots of Crystal Effects, and sprinkled Red Chunky Essentials Glitter on them. The patterned paper is from the Designer Series Paper Ski Slope, also in the Holiday Mini. The Noel stamp is from Many Merry Messages.

Thanks for taking the time to look at today's project!

dd

Wednesday, November 19, 2008

A Stampin' Up! Christmas Tree

I have been playing and making ornaments for a small Christmas Tree that I will display during the holidays. These are just too cute, and simple to make.

The scallop circle ornaments are made using the Scallop Circle Punch. Just punch 8 circles fold in half and glue them together. Before gluing the last section, I used the hat pin, beads, and flowers from the Pretties Kit to dress them up.

The round tin ornaments were made with tins purchased at Michaels. I used the Deer Friends Hostess set and the Scallop Circle Punch to make the design for the inside. I used my Crop-a-Dile to punch a hole to add the ribbon for hanging, and a little fake snow. Before closing the tin, I put a small amount of Crystal Effects around the edge to seal it so it wouldn't come open. You can also just add a magnet to the back for really cute holiday refrigerator magnets.
The little cube ornaments, my personal favorites, were made using the Scallop Square Punch and the Deer Friends Hostess set. The little glass cube ornaments were purchased at Hobby Lobby. They are the perfect size for the Scallop Square Punch. The set of ornaments comes with a small tube of silver glitter glue, so on a couple of ornaments, I squeezed a little glitter glue inside the ornament. Just enough, to drip down the sides. I gives it a snow or icicle effect.
For this snowflake ornament, I squeezed a small amount of Crystal Effects inside and the added some glitter. The snowflake is from the Little Felt Flurries, in the Holiday Mini Catalog, and the Crystal Brad is from the Pretties Kit.
As I was tying the ribbons on to these ornaments, I noticed that the circle for the hook would hold a name card, so I made a name place holder too!

Hope you enjoyed today's projects.

Thanks for looking!


dd

Tuesday, November 18, 2008

Where Women Create


Just a quick post today to tell you about a new magazine, it's more like a book, 159 pages.


Where Women Create is a new publication by Stampington & Company's Somerset Studio. This is the Premier Issue and features several fabulous craft studios. One is of particular interest to me. Shelli Gardner, CEO of Stampin' Up! Her stamping/crafting studio is amazing! All of them are. Most of us probably don't have quite the room, or the resources to have rooms like these, but maybe you'll see something that will work for you in your efforts to organize your craft space.
I got my copy at Michaels.
Thanks for stopping by today!
dd


Saturday, November 15, 2008

Rub-On Cheer & Country Living

Stampin' Up! is at it again! This time there are a couple of specials that I need to tell you about. First, if you love SU Rub-Ons as much as I do, you're going to want to take advantage of this spectacular offer. When you spend $20.00 on SU product, you will get 20% off of all Rub-Ons! That includes anything in the 2008 Fall/Winter Idea Book & Catalog, the Holiday Mini, and the Celebrando Creatividad--the Spanish Catalog. The rub-ons in this catalog are in Spanish, but there is one on page 39 that is images only that coordinates with the Eastern Blooms set. I plan on using the Christmas Rub-Ons for my Holiday Decorating, Wrapping & Tags.

Once you spend your $20.00, there is no limit to the number of rub-ons that you can get at 20% off. This offer is only available thru November 30, 2008.

Stampin' Up! is featured in the December issue of Country Living. There is a great spread showing lots of projects for the Holidays. You can purchase the Holiday Collection Stampin' Kit which includes all of the products you need to create the projects in Country Living magazine, and more. The kit includes an exclusive set of 6 stamps, 4-12x12 Sheets Die Cut Chipboard Shapes, 2 each of 4-12x12 Double-Sided Die Cut Designer Series Papers that coordinate with the die cut chipboard, 2 each of 2-12x12 Double-Sided Designer Series Papers, 2 sheets 12x12 Whisper White Cardstock, 25 yards Silver Metallic Cord, 10 yards 3/8" Whisper White Taffeta Ribbon, 20 Components from the Pretties Kit, Stampin' Dimensionals, Dazzling Diamonds Stampin' Glitter, Tombow Multi Purpose Adhesive, Riding Hood Red and Old Olive Classic Stampin' Spot, uninked Stampin' Spot, and Whisper White Craft Ink Refill. WOW! All of this for only $49.95! Country Living is also offering a special subscription price for SU customers, and a Bonus mini stamp kit with subscription. You can go to http://www.stamp.countryliving.com/ for details. This offer is available now, thru December 31, 2008.

Contact me today to get this super Holiday Collection and start decorating!

dd

Friday, November 14, 2008

Thank Goodness It's Friday--I Guess!

Have you ever had one of those days where things just don't go as planned? Well I seem to be having those days more often than not. I guess I could just stop planning on trying to do so much, but that's just not in my personality. I actually emailed my brothers & sisters today, so I can start planning the menu for Christmas Eve. I know it's like 39 days away! I figured if I start now, I will be so organized that there just may be the possibility that I can get everything done on my ever-growing list. Yes, I am a list maker. I have lists for everything. I am also the type who makes new lists instead of crossing things off. I know, not good, better to see the crossed off items so you can actually see how much you've accomplished. Learned that years ago at some Management Workshop I attended, but those lists are too messy for me, so I just make new ones. Post-It loves me I'm sure!


The card I want to share today is one we did at the Birthday Stamp-a-Stack. It was done using the Watercolor Technique. Several people opted not to do watercolor, and just colored the balloons with Stampin' Write Markers. That works too, of course, and we stress in our classes that we don't want anyone to "stress" over making the cards, and we like to see you express your creativity and do your own thing! I actually got this idea right from the SU website. There is a great video you can watch to see exactly how it was created. You can watch the video by going to http://www.debbied.stampinup.net/.

To get the best effect with Watercoloring you should use watercolor paper, which can be found on page 166 of the Fall/Winter 2008 Idea Book & Catalog. You should also use Stazon Ink to stamp the image to be watercolored. This is a Solvent Ink, and won't bleed. I did not have the Happy, Happy Birthday Jumbo Wheel used on the SU sample, so I "expressed my creativity" and used the Stars from the Classic Background Set. There are a couple of products you can use to Watercolor. The Watercolor Wonder Crayons, Blender Pens, and the Aqua Painters, which is what I used here. Check out the video & then give it a try! It is really fun and gives a great look to your cards or scrapbook pages.

Okay...now I can go cross another item off of my "to do" list for today!

Thanks for stopping by today--have a Great weekend!

dd

Tuesday, November 11, 2008

Did You Miss Me?

I definitely missed you!

I have been having major computer issues. I think mine was possessed by the demon aol, so I had to perform an "exorcism" on it yesterday. Long story, and I'll spare you the details. We haven't had aol for quite some time, but it would just pop up randomly, and kept trying to "sign on". I think it was jealous that I had switched, and was using internet explorer. I couldn't do anything on my computer yesterday. I was becoming quite agitated and finally just deleted the whole program. I think my computer is much happier now, and it's working like a dream!

So...I can finally share a couple of cards that we did in the Birthday Card class this past Sunday. We had a fabulous time, as usual, and what a pleasure to have everyone contribute food and snacks! Everything was scrumptious.


One of my assignments for this class was to create the two masculine cards that we would be making. Sometime these are difficult for me, mostly because 95% of the stamps I own are flowery! I actually ordered the Nature Silhouette Set so I would have something masculine to work with. I had recently ordered the Happiness is a Journey Set, because I love that saying. Here are the two cards that I came up with.

Supplies:
Nature Silhouette, Inspired by Nature, Sincere Salutations Stamp Sets
Sahara Sand, Bordering Blue, Bashful Blue, Whisper White Cardstock
Bordering Blue, Basic Black Classic Ink
Mini Library Clip, Stampin' Dimensionals


I just realized when typing the supplies, that my Linen Thread that I had tied on the Mini Library Clip is gone. If you want to add just a little something, tie a small bit of Linen Thread in a knot around the Mini Library Clip. It looks really nice...really it did!

Supplies:

Happiness is a Journey Stamp Set

More Mustard, Not Quite Navy, Very Vanilla Cardstock

Not Quite Navy, Chocolate Chip Classic Ink

Gold Brads, Twill Ribbon

There you have it! Two "manly" cards. You can also just change the color combination for some other great looks. Try More Mustard with Bravo Burgandy, or Elegant Eggplant. I also did this card with Always Artichoke. That one will go to my Dad on December 1, for his Birthday. The deer will go to Scott's Dad tomorrow for his Birthday. Looks like I did these cards just in time.

Thanks for checking in today. I'll try not to go a whole week without posting from now on!

dd

Wednesday, November 5, 2008

New Colors

I finally got around to changing my color scheme. What do you think?

I left the pink up through October for Breast Cancer Awareness Month, and decided since it has been so beautiful here I would shoot some fall colors. This is actually in my yard, so I get to enjoy it everyday...for a little while longer any way. I'm sure it will get cold soon, and all the leaves will be gone for the winter. After all, it is November, but it still feels like September.

Here is another card that uses Kiwi Kiss and Brown. The patterned paper is from the Designer Series Paper, Bella Rose. This is one of the stamp sets that we got at convention, Inspired By Nature. It is stamped right on the printed paper with White Craft Ink. I love it that you can still see the polka dot pattern through the white ink.

I have a busy day today, mostly preparing for class on Sunday, but a lot of the normal stuff we always have to do to. Grocery shopping, laundry, cleaning, you know the drill!


Enjoy this Wonderful Fall Wednesday!


dd

Tuesday, November 4, 2008

Workshop Cards

Good Morning!


I actually did a Workshop in a customer's home this past weekend. I have been focusing on my classes, and haven't done a true workshop in a while. It was good, and fun! I had forgotten how much I enjoyed doing them. I took lots of samples...some you have seen here, and some you haven't seen...yet! I do have a couple of the cards that I demonstrated to share with you today.

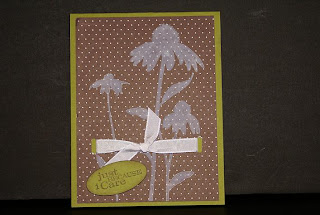
This first card was created using the Pocket Silhouette Set, Kiwi Kiss Classic Ink and cardstock, and Pacific Point cardstock. The patterned paper is from the Patterns Designer Series Papers. I used the Scallop Square Punch to punch out the flower image after stamping them. Then I used both the Small and Large Oval Punches to layer the sentiment. The ribbons are the 5/8" Grosgrain Stripe in Kiwi Kiss, and the scrumptious Double-Sided Satin Ribbon, which is also Kiwi Kiss on one side, and Very Vanilla on the other. I love the combination of the Kiwi Kiss and Pacific Point. It's very bright & cheerful!

This next card uses Kiwi Kiss, Chocolate Chip, and Baja Breeze, another yummy combination. This is the One of a Kind and the Heard From The Heart Stamp Sets. The flowers were stamped & then punched out with the Boho Blossoms Punch and mounted with Stampin' Dimensionals. I used my Mat Pack to line up my paper piercing. I felt it needed just a little "something", so I added the Linen Thread. The corners were punched with the Ticket Corner Punch.

It's going to be a beautiful day today! Don't forget to VOTE! See you tomorrow.

dd