 Don't forget to check out the great deals during the Clearance Blitz!
Hope you all have a Very Merry Christmas!
dd
Don't forget to check out the great deals during the Clearance Blitz! I finally finished putting together what I thought would be a simple tutorial for this great little Gift Card Holder. I don't like giving too many gift cards, but every year at Christmas, it seems that there are some people who would either prefer one, or I just can't come up with another idea! So, when I do give one, I like to make it fun to receive. When going through some of my samples, I came across this one. It's fun & easy so I thought I would also share it with you here!
 The base is 4-1/4" x 11". So you can get 2 out of one sheet of 8-1/2" x 11" card stock. I used Early Espresso. Score this at 2-1/4" and 6-3/4". Fold on the score lines.
 Cut 2 pieces of coordinating Designer Series Paper 2" x 4". I've used Letters To Santa here. With the folded holder facing you, adhere DSP to "top" and "bottom" of the front of the holder.
 Open holder. With the right side facing up, and top facing away from you, punch a slot for the Gift Card using the Word Window Punch. The gift card is slightly wider than the punch, so to make the slot long enough for the card, just move the punch over a little and punch again, elongating the first punch.
 Cut a piece of Whisper White Card Stock 4" x 4", stamp image & sentiment and adhere to the inside. I realized when doing this that I had chosen a retired stamp set ~ Jolly Old Saint Nick, but I love that Santa Face image.
 The Belly Band is 1" x 10". Wrap it around holder, but not too tight. You want to be able to slide it up and down. I put the seam in the center front and cover it up with the Scallop Decoration.
 I punched the 1-3/4" Scallop from Cherry Cobbler Card Stock, layered a 1-1/4" Early Espresso Circle Punch, and then the Santa image from the Jolly Bingo Bits Stamp Set punched out with the 1" Circle Punch.


 Before putting the cone together, I embossed each piece using the Spider Web Textured Impressions Embossing Folder. Then to add a spooky touch, I used a Sponge Dauber with White Stampin' Pastels and gently rubbed over the spider web. You'll also want to add your Designer Buttons strung on Hemp Twine before assembling your cone. Use a bit of Sticky Strip to tape the end of the twine inside the cone. Just use it like regular tape, without removing the top protective plastic strip.
 Now, you can assemble your cone. Decorate the flaps with Frightful Sight Designer Series Paper, add a Scallop Dot Ribbon handle, secured with Glimmer Brads and you're ready to fill it with Spooky Treats!
 Aren't they adorable! This is the Holiday Trio we made in class yesterday. These were made with the Big Shot, the Fancy Favor Bigz XL Die, a few Punches and some fun Embellishments.
 And, right now, if you want to get your Big Shot for FREE, you can! Join my Team of talented stampers during the month of October, and your new Big Shot will come to your door with your New Starter Kit. Just in time for your Holiday crafting!
 I have so many things to share. I'll start with an adorable Halloween card created with the Out on a Limb Stamp Set. I love this cute little witch, flying over the roof top. The moon was made by punching a hole with the 2-1/2" Circle Punch and layering Vellum behind it. It's even more adorable when you put a battery operated tea light behind it!
 There's also several promotions for the month of October. If you've been thinking about joining my Team, you can get a Free Big Shot when you do! Looking for a fun Holiday Gift? Try our brand new Sweet Pressed Cookie Stamps! Do you know someone who likes stamping, but doesn't know where to start? Another great gift idea are the Simply Sent Card Kits. During the month of October, when you buy 2 kits, you get a coordinating stamp set Free! Click on the links, or contact me for more information about any of these great deals.
 Have you ever thought to yourself that you don't have time to make cards, or that you're not creative enough? The Simply Sent Card Kits are the perfect solution! During the month of October, when you purchase 2 Simply Sent Card Kits (pages 192-193 in the catalog) you'll get a coordinating Stamp Set from the same pages for FREE!
 Check it out, she has some great projects.
 This little Jelly Jar Pin Cushion went together pretty quickly. I really wanted to do it with the new Holly Berry Bouquet Designer Fabric in the Holiday Mini, but I haven't received mine yet, so I went with the ever so cute Candy Cane Christmas Fabric in the big catalog. It's very cute too, and worked just fine.
 Today is the first day we can place orders from the Holiday Mini Catalog! This catalog is 43 pages of total awesomeness! There are products for Halloween, Fall, Christmas, Valentine's Day, Easter & More!
 We started with the Simply Adorned 8" Bracelet. Then we stamped the images on Shrinky Dink Plastic with Stazon Ink. This is a quick drying permanent ink that works great on nonporous surfaces.
 We had so much fun stamping and punching out several different shapes to create the charms for our bracelets. Some of the shapes we used were the Scallop Circle, Postage Stamp, Ornament, the Scallop Triangle from the Petite Pennants Builder Punch, and from the Holiday Mini Catalog, the new Stocking Builder Punch. We added a Black Crystal Bauble to our Halloween bracelet, and a Clear Crystal Bauble to our Christmas bracelet. Everyone also had their choice of adding a Key Trinket or a Crown and Pumpkin Pie, Real Red and Basic Black 1/8" Taffeta Ribbon.

 The sentiments I've used are all from the Happy Greetings Stamp Set found in the Occasions Mini Catalog. This set, and all of the products in this mini are available through August 31.
 Halloween really isn't that far away, especially when it comes to planning your cards and projects. I tried a new technique on this card. Cutting, Embossing and Inking Wood Sheets. First, I cut the letters from the Wood Sheet with the Big Shot and the Simple Letters Alphabet. Then I embossed the letters using the Square Lattice Embossing Folder. Next, I sponged them with Basic Black Classic Ink. I think it gives it a very spooky look.
 This project features several new products in the mini. The new Peekaboo Frames Bigz Die, the 25 & Counting Stamp Set & coordinating One Inch Square Punch and if you look closely, you'll see the new Mini Jingle Bells. I used the Letters to Santa Designer Series Paper from the current catalog, but you know there is going to be Christmas DSP in the mini. Not just one series, but two! Oh yeah, you're gonna Love it!
 And how I completed day 25.
 Thanks so much for your kind words about my Rosette Tutorial. I hope you have as much making them as I did, and Thanks today for stopping by!
 For the 6" Rosette ~
 2) Score at every 1/4" across both strips. This is amazingly easy with one of the new tools being introduced in the mini ~ hint hint. Fold accordion style.
 3) Using Sticky Strip, adhere both ends together, forming a tube. I recommend Sticky Strip rather than Snail because it is a much stronger adhesive and won't pull apart.
 4) Gently pull the top of the tube together and ~
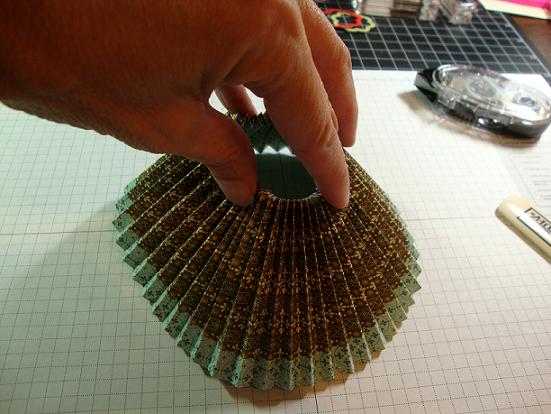 5) Push it down. There's your Rosette ~ embellish to your liking!
 6) I punched a 2-1/2" circle and used Sticky Strip to adhere it to the back to stabilize the rosette while I decorated it.
 I used the Scallop Circle #2, Two Tags Die and the Big Shot. The leaves are from the new Gently Falling Stamp Set from the Holiday Mini, as is the Designer Button. These new buttons are 1-1/2"! I wanted something with more of a contrast that would coordinate with my paper to put in my button, so I cut a very thin strip of DSP with my Table Top Cutter to weave through the button holes.
 Can you imagine a Christmas tree decorated with these, or making all of your Christmas tags like this? Oh, the possibilities! Now is the best time to stock up on card stock to create your rosettes, with the Buy 3 Get One Free Promotion through August 31.
 I used the new Fancy Fan Letterpress Plate to create the background. I inked up the plate with Versa Mark, placed my Baja Breeze card stock on top of it, and ran it through my Big Shot. This embosses the card stock and gives it the tone on tone look at the same time. The base of the card is the new In-Color, Island Indigo. Check out the new Ruffled Ribbon. This comes in all of the new In-Colors. The lacey border was created with the new Lace Ribbon Border Punch. I just cut it in half and put it above and below the Whisper White Card Stock used for the sentiment.
 See the stamping on the little butterfly? This is another stamp from the My Friend stamp set. I stamped a scrap of paper with Baja Breeze Classic Ink, and then used the Beautiful Wings Embosslit Die and my Big Shot to punch it out. I've used all 3 different sizes of Basic Pearls to put the finishing touches on my card. Two medium pearls on the body of the butterfly, 3 large pearls on the ribbon, and the tiniest one on the swirl in the words my friend.
 We did our shoebox swap again, because we all enjoy it so much and it's a great way for all of us to get several new samples to share. Each Demonstrator designs a card and prepares everything for every other Demonstrator to make it. Then, we all rotate stations making each card. It's great to relax and make cards that someone else has designed & prepared. We also bring other samples to share, have product demonstrations, discuss business and eat great food. I always look forward to these days. They are such an inspiration and I truly enjoy spending time with my Stampin' Up! family.
 Starting today, through August 31, when you buy 3 packages of Designer Series Paper, you get a 4th one FREE! Now is the perfect time to stock up for your holiday projects, scrapbooking needs, or just add to your stash. You can bet that's what I'm going to do!
 I cut the flowers with my Big Shot and the Flower Folds Die. One of the greatest things about cutting fabric with your Big Shot, is that you can cut up to 8 layers at one time! So I only had to run the fabric through one time to get all 6 flowers. I sprayed them with fabric stiffener, crumpled them a bit and let them dry. Then I layered them, off setting them so I could see all of the cute patterns. I added a Designer Button with a bit of Baker's Twine tied in the center and hand sewed it to the bag.
 I think it's just the perfect finishing touch!